 1 1 |
 2 2 |
 3 3 |
 4 4 |
 5 5 |
 6 6 |
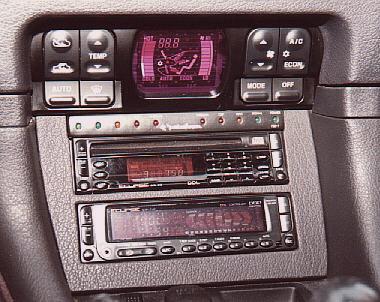
I had decided to take on the Eclipse DDL/GFO system (Direct Digital Link/Glass Fiber Optic). This consists of the ECD-510 head unit and ESD-530 12-disc changer, the EQS-2000 Processor with the EQU-8040 expansion module inside, and the EQR-2140 controller for the processor. The 510 and 2140 are head unit pieces. The head unit and changer are connected to the processor via glass fiber optic cables. This eliminates any chance for picking up magnetic or electronic noise in the signal path, resulting in a much cleaner sounding system.
Since the factory unit in the S3 cars are double-DIN, the fact that the DDL/GFO system has 2 head unit pieces was a problem easily solved - mount both in the factory head unit location. Since I'm a nut when it comes to lights, I had to have the Rockford Fosgate Punch Status Display (PSD-1) and, although it was installed later, also integrated it up front.
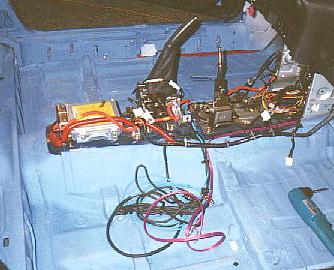
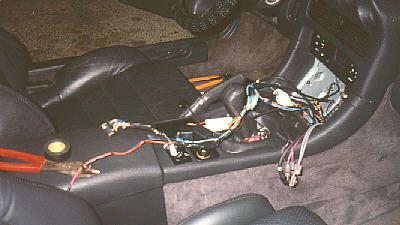
The first picture shows the initial wire laid. They were brought down the middle rather than around the edge of the car because the processor (to which everything connects) was going to be in the passenger seat, and the signal path would be shorter. The second picture shows the bundling of the wiring with wire-ties for the head unit.
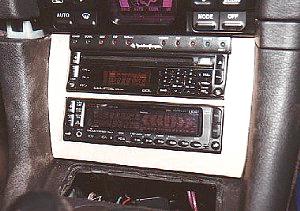
The 2 head unit pieces were mounted using the factory mounting brackets. There are two brackets (1 for each side) which held both pieces as a single unit, and it simply slides into place in the opening and bolts in. There is not (nor a need for one) a rear support bracket.
The brackets to hold the PSD-1 would not work for holding it in place properly. It ended up falling too far into the opening and would end up partially behind the climate control piece (the buttons and LCD screen above the radio). To solve this, I made a wedge of wood which was attached to the top of the CD player. That wedge has attached to it a pair of custom made brackets that angle up and forward to hold the PSD-1 at an angle and keep it from sliding back into the opening. Now it firmly rests right above the CD player and stays flush with it and comes forward to meet the bottom of the climate control unit. This gives a very clean finish.
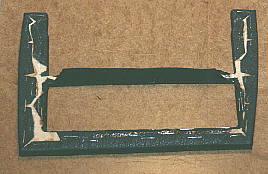
Making the new trim panel turned into a major undertaking in and of itself, especially for what seemed like such a small and simple part of the car. Heh. Not so. What is in the car now and shown here is about the 5th attempt, and 3rd in the car. The first one done at the time of initial installation, was made using the factory plastic trim piece. That piece was enhanced by adding a piece of plastic through the middle, to go between the 510 and 2140, and then covered with a piece of grey vinyl and painted to as close as possible match the color of the factory vinyl. The color match was good, the material was not. It was not the same texture/grain as the factory vinyl. Not to mention, since the PSD-1 was actually added later, the top had to be removed to fit the PSD-1. This worked but was temporary.
I took on the task of designing and constructing a new trim panel before the 1996 IASCA Finals. It took over 2 weeks (of nights and weekends - hey, I work for a living! ;-) just for this one piece.
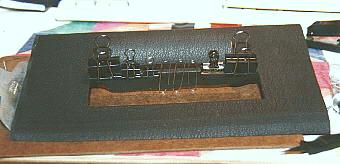
Using 5/8" MDF it took three tries, but I finally got a piece cut which fit perfectly, and such that once covered with vinyl, would be a perfectly snug fit around everything (picture 3). I really wanted to use a piece of factory vinyl. So I did... The car came with a roll-out taneau cover for the hatch area. Well, with subs back there, I had no need for it, nor would the unit even fit in the car. So I decided to cut that for using.
It took about 4 nights to complete the glueing process - each night for another stage. First I glued the wood piece to the vinyl, assuring that the glue was even and there were no bubbles. I then placed it on a flat surface, vinyl side down, and stacked a few cases of Coke on top of it to keep it smooth, flat, and in place.
Over the next nights, I glued the vinyl around the edges using various clips (picutre 4), C-clamps, a staple gun, and weights to keep the vinyl tight and smooth while the glue dried. Oh, and the glue of choice?? Testors modeling glue. Yup. The stuff in the orange/white tubes you can get anywhere. I had been through about a dozen other glues for another project and had no success with them. And with the porous nature of the MDF and vinyl, it was a perfect match. Takes longer to dry but it dries very hard and stays. Perfect. Also, a key thing - it doesn't melt in the extreme heat inside a dark car on a hot day.
Picture 6 shows the final product. Well worth it I thought. It's factory vinyl, looks better than the factory plastic trim panel, fits perfectly. And was the ONLY (ironically so) creativity points I got at the 1996 IASCA World Finals - both days of judging! One point for the trim panel each day. COOL! Even though I felt I shoulda had more, that made me happy. Plus, I frequently get compliments on the trim panel. Thanks for those guys!

