 1 1 |
 2 2 |
 3 3 |
 4 4 |
 5 5 |
 6 6 |
 7 7 |
| Due to requests, I have added a couple large images that have the dimensions of the
Stealth/3000GT trunk/hatch area - should a fellow owner need them. Plus the specifics of the
dimensions of my box. Click on the links below for each image. They are huge as far as
height/width, but relatively small file size. They will open in a new browser window. Simply close
the window to return to this window. Hatch Dimensions Box Dimensions |
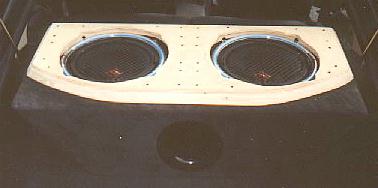
My original designs included a pair of 12" Oz OL-300's. During discussions with the guys at Radio Shack, I learned that those speakers wanted a LOT more space than I was willing to give up. They told me that a pair of 10's would probably keep me happy. I had a pair of Rockford 10" audiophiles in a bandpass box in my previous car (1992 Toyota Paseo) and they did great. So I decided to go with a pair of Rockford 10's. But I upped the ante to a pair of Power 10" subs. I just couldn't resist the looks of them. I love the chrome backed magnet. Ironically, I never got the mirror added in the box so you can't even see the chrome backs. Oh well....
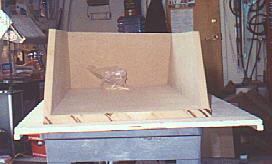
Anyway, during the design process I built the box entirely out of cardboard. Larry, who built the box, knew exactly what to do based on this. He even enhanced it a bit once building started.
Picture 1... Uhhh... It's crooked! Heh. Nope. It's perfect! The box angles in two ways. One, it angles down from the front part (front of the car) toward the back - this was to enhance clearance for when the hatch is closed down, gives it a great snug fit. Two, the top edges angle inward from front to back to clear the hatch support struts when it's closed. They fit perfectly between the inside of the opening and the box.
All along during design, I wanted a plexi window in the box and black lights inside. I had found a neon blue paint that glowed bright when hit with a black light. I was going to paint the inside with it. I had about a half dozen different design options for the box before finally deciding on the one that was built. Worked out perfectly, too. The window faces toward the front of the car, and is visible when the rear seats are laid down, and of course hidden when they are up. A 4" aeroport fires backward into the remaining space of the trunk. I painted the inside with that blue paint using sponge brushes. I made sure I multi-coated it and kept it as smooth as possible.
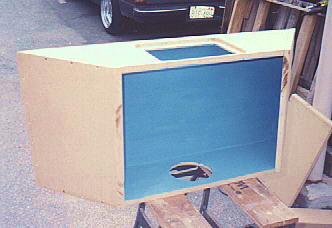
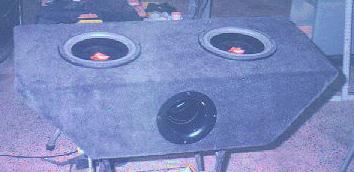
Once it was and built all necessary holes cut, it was covered with grey carpet. The port, plexi, and subs were mounted in.
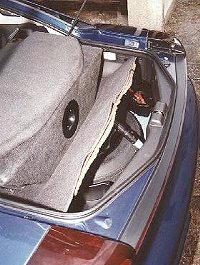
There's a story behind the grills... While putting the subs in, we realized that one of the surrounds was loose, for about a 1/4 way around the sub! The whole thing was unglued. Well, they only had 2 Power 10's. So we glued it back down, and put it in. To keep it in place, we added the grills. So they were actually installed not only to protect the cones, but to hold the damn things in the baskets!! But that was alright, I wanted them on in the first place. And to top that off, I was bolting them in (not for the first time) and oopsed with the screwdriver and put about a 1/8" tear in the foam surround. DAMN! They did order a couple new drivers to replace these two. Now here's the real clincher. I still have the original subs in there! Never swapped them out. The grills held (so did the glue), and the hole never grew, despite hitting a whopping 141 db at the first show I went to with the new installation. I'm still running the same subs and still pounding out impressive db's and awesome bass.
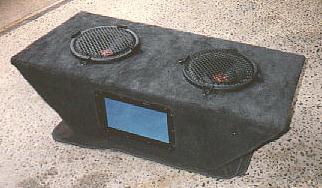
The neon was also added during the initial installation. I love having it. Problem was, though, that it was way to bright during the day. Huh?! Well, I hadn't yet tinted out the back window (now it's got 5%) and on a sunny day all I could see in my rear-view mirror (back window) was speakers and rings. Real pain. So I decided to design a cover for the whole thing.
I designed it using cardboard first, of course. Then made it using 5/8" plywood and 2x6's (picture 5). Cut it such that it cleared the speakers, the bolts the neon rings are mounted with, and flushed nicely with the hatch when it was closed. Thus it curves in at the edges. Screwed and glued (wood glue this time) everything together. Used the same grey carpet as used elsewhere during the installation to cover it: loads of staples and spray carpet adhesive.
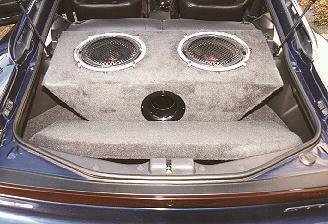
Picture 6 shows the completed cover resting on the box. It also shows another feature of my trunk - there's still plenty of space for all my traveling. As well as the spare tire and all the plastic compartments underneath the hatch floor. I cut and hinged the floor at the bottom edge of the box so I could access underneath the floor. Furthermore, the whole box is hinged. The front/upper corners have 2" dowels attached and rest in the brackets that held the taneau. Grab the box by the upper back corners and lift up and it'll roll all the way over, allowing full access to the spare tire without having to remove the box. The speaker wire and power wire for the inside blacklight are connected using banana plugs (so they'll pop out if I forget to unhook them to remove the box) and the neon uses a special plug, so everything disconnects for box removal.
The final picture shows the box cover in it's alternate resting place. This was a lucky fluke of the design, but because the back corners are rounded in, the cover rests in the remaining area of the trunk perfectly so that the hatch will still close down normally. Sha-zaam!

