 1 1 |
 2 2 |
 3 3 |
 4 4 |
 5 5 |
 6 6 |
What you're looking at here is the second generation of door pods to be installed in my car. The first ones done at initial installation were made of a hard blue foam material, epoxy'd, and carpeted. They worked alright but after a while, started to lose their integrity. Primary problem was they were really too large and the speaker covers just never seemed to stay on.
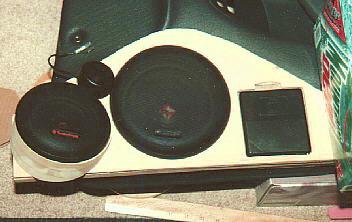
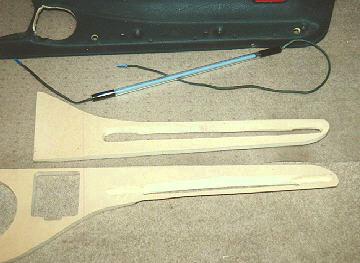
So very early spring 97 (more like m-m-mid-w-w-winter), I decided that I wanted to construct some new ones that were stronger, smaller, and rearranged the speakers. I wanted to try moving the 4" driver. The original pods had the 6" driver and the 4" driver just behind it (where the cupholder now is); I wanted to try to move the 4" forward to the other side of the 6". I knew this would mean kinda hanging it off the end of the pods, extending it beyond the actual door panel, and I wanted to angle it back and up, hoping to improve the sound stage (pushing it forward being the primary factor in this). I of course planned to integrate the 18" strip of neon.
The design process was tricky, because I had to do it on the showroom floor of Radio Shack where the car sat on display for 2 months (January - March 97). Of course I made a template with cardboard and had an extra set of the drivers to work with for spacing. I fudged things so that I could move the 6" driver as far from the front of the car as I could while still having it clear the factory opening in the metal of the door. This gave me a little more room for fitting the 4" driver at the front of the pods. I spent a lot of time playing with the speakers in the car to make sure the 4" driver would fit and the door still close and it not interfere with legroom too much.
Another part of the design was to move the tweeters from higher up on the door down right beside the midrange, as part fo the door pods, achieving full-fledged kick panels in the doors. I didn't want to do kicks in the standard location because there are computers behind the carpeting down there and kicks in the doors would be much more unique anyway. Plus more of a challendge and fun to build.
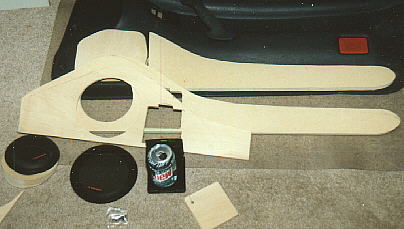
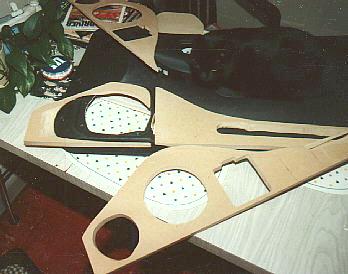
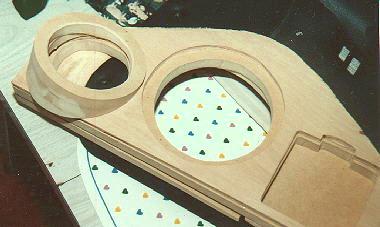
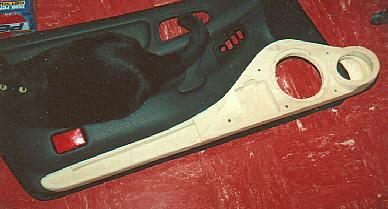
With the design in mind, I went after a sheet of 3/4" MDF with some powertools. Got the main pieces all cut. Then realized that I had a bigger task on my hands. The way I had things cut the first time around didn't work... Didn't fit with the angles of the door panels. Damn. Back to the drawing board. Same physical shape this time, but had to revert to designing a puzzle of layered pieces. Ended up with one piece running the full length of the pod, then a back piece along the "tail" for depth there to mount the lights and keep the pod straight forward/backward with the side of the car. That piece tapers off as the door panel thickens toward the front. Had to add an outer piece of 3/8" plywood to have enough depth for mounting the oversized 6" driver and more thickness for angling the 4" off the front end. Then there was another back piece that went behind the front end to fill out the edges. Then, of course, the series of "donuts" that were cut, glued and sanded to form the angled "tube" the 4" driver was to land in. Pictures 4 and 5 show the puzzle.
With all these pieces cut, there just seemed to be something missing... I had this big flat space where the 4" driver used to be. BING! An insane idea popped into my head. With all the travelling I do, having some cupholders in there would be the ultimate in coolness and convenience (and fellow S3 owners can relate to me what with our lousy "excuse" for a cupholder in the center console - practically behind you). I had an idea of a fold-out cupholder that would simply flush in flat but then open up when I wanted to use it. I thought I was gonna have to custom build something but looked around to see what was available. A few catalogs, department stores and auto parts stores later, I had found the magic answer - a simple-yet-stylish fold-away cupholder that was about 3.5" square. I bought one, to see if it would fit in the space I had available. I nearly bounced off the walls when I discovered it would be a PERFECT fit! I was psyched then, I tell ya...
So I bought another one and integrated them into the design, adding spaces in the already cut pieces. It was working out almost too perfectly. But I actually never hit a hitch with integrating them.
Then came the sanding... Went through 4 belts on the belt sander working these two pods (well, 4 pods, had to rebuild after doing the first ones wrong). Had to sand everything down so the pods would flush against the door panel with no gaps. Talk about a long process of sand, test, sand more, test again, sand more, test again, over and over. Finally got things pretty much the way I wanted.
The real trick was integrating the neon into the wood. Working with 2 pieces, getting the outer piece cut wide enough so only the light was visible, and getting it cut at an upward angle, and getting the inner piece cut wider enough to fit the full length of the bulb. Took some work and difficult cutting with the scroll saw ans routing with a grinder bit on a drill. Finally got things just right.
Now I had to attach the pod that holds the 4" driver. Had to sand down the glued-together rings so they were at an angle. Then attach them and sand all around to round things out and give it enough clearance on the back to clear the body of the car when the door is closed, and not sand off too much so there would be a solid back to the whole thing. In addition to sanding off part of my wrist, I left about 20 pounds of sawdust (man, MDF is dusty) in my stairwell. I think I'm still blowing it out of my nose! Got no garage/workshed and couldn't work outside in a foot of snow... So had to work in my entry way and stairwell.
Anyway, got everything sanded down, drilled holes and bolted it all together (as well as glueing of course), and did some final sanding. Once I had that done, I spray painted it black. At this point I was ready to tackle the task of covering them...

